
Tuesday, July 20, 2010
Drawers
Having met with the cabinet maker today it is probably a good day to try to draw some drawers. All banks of our drawers except for the bin drawer are over 720mm deep sections with 168 drawer at the top and two 268 (obviously there are gaps there). The drawers also have a 2mm pencil edge (I'm not too sure how I will model this).
 OK so there are some quick ones. All that I can be bothered with tonight. Maybe the cupboards above tomorrow.
Monday, July 19, 2010
Ovens
We have dual ovens:
 This looks pretty easy to make up. I might make a new file for this one.
Here's my quick attempt


Here's my quick attempt


Sunday, July 18, 2010
Benches in Place
I mucked around a little more, playing with layers and names of sections etc. I now have this:


Modelling - Plaster Walls 2
Ok so everything in blender seems to start with a box and it needs to grow from there. I will start by turning the box into a square and then turning it into the outline of the wall. This will be done with the following keys:
b - box select also can select using the right mouse button
x - delete
g - grab (to move things around) (also if you press the middle mouse button it will lock into an axis)
e - extrude (followed by a number to get more accurate information)
I like to have the edge lengths displayed. In 2.49 you did this in the mesh setting. In 2.5 I had to click View/Properties/Mesh Display/Numerics/Edge Lengths. Then I got this view:
 So I've been using a lot of the scroll wheel to move in and out and the shift and central mouse button to pan around.
Also to copy some stuff to make it easier I pressed shift D. I then also selected two nodes and clicked F to fill between the elements to check that the dimension that I added was OK.
I have also been using the numpad keys. 1 - looks front on and 7 from top perspective. The direction that you look from when you do things in blender also appears to be important.
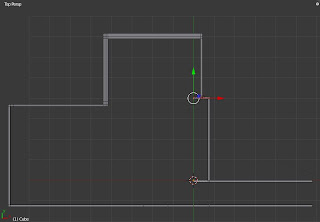
Here is the outline of the walls.:
 Now I will add elements for where the windows are cut out, doors, etc. I will then be able to delete them once I extrude up.
I tried to do a remove doubles (press W and select remove doubles) however this did not seem to do anything. The previous version used to let you know how many duplicate nodes were removed. I also did some subdivisions where you need to press W and then select subdivide. This let me find the middle of the double doors etc.
OK so here are the solid walls:
 Now I will just delete the window and door cavities.
Whoops, this didn't really work. I am left with a lot of extra bits. I think I will actually drop it back down and delete and copy the right bits.
That's better. Walls and windows.

b - box select also can select using the right mouse button
x - delete
g - grab (to move things around) (also if you press the middle mouse button it will lock into an axis)
e - extrude (followed by a number to get more accurate information)
I like to have the edge lengths displayed. In 2.49 you did this in the mesh setting. In 2.5 I had to click View/Properties/Mesh Display/Numerics/Edge Lengths. Then I got this view:

Also to copy some stuff to make it easier I pressed shift D. I then also selected two nodes and clicked F to fill between the elements to check that the dimension that I added was OK.
I have also been using the numpad keys. 1 - looks front on and 7 from top perspective. The direction that you look from when you do things in blender also appears to be important.
Here is the outline of the walls.:

I tried to do a remove doubles (press W and select remove doubles) however this did not seem to do anything. The previous version used to let you know how many duplicate nodes were removed. I also did some subdivisions where you need to press W and then select subdivide. This let me find the middle of the double doors etc.
OK so here are the solid walls:

Whoops, this didn't really work. I am left with a lot of extra bits. I think I will actually drop it back down and delete and copy the right bits.
That's better. Walls and windows.

Saturday, July 17, 2010
Modelling - Plaster Walls
The first step to get the kitchen right is to model the walls and the floor that are made from plaster.
I forgot to mention that currently blender is undergoing a reasonable change from version 2.49b (which is the most resent stable version) to a new version 2.5. I have been playing with 2.49b for a few weeks however the new version seems to have more features and may be simpler to learn. I will therefore start playing with 2.5 as part of this process.
Therefore first step is installing the right version of 2.5. The blender website has Blender 2.5 Alpha 2 as the latest download. There are not too many tutorials etc. that relate to Blender 2.5, however the blender artists forum has very good tools and discussions on its use.
I will first try to install 2.5 and keep 2.49b.
 Whoohoo success, I now have the new version of blender.
OK lets get started. The first thing that I need to do is start drawing up the walls. I will use a scale of 1 blender unit to 1m.
Here are the current plans:
 And here is the setout of our kitchen bench and cupboards:

I forgot to mention that currently blender is undergoing a reasonable change from version 2.49b (which is the most resent stable version) to a new version 2.5. I have been playing with 2.49b for a few weeks however the new version seems to have more features and may be simpler to learn. I will therefore start playing with 2.5 as part of this process.
Therefore first step is installing the right version of 2.5. The blender website has Blender 2.5 Alpha 2 as the latest download. There are not too many tutorials etc. that relate to Blender 2.5, however the blender artists forum has very good tools and discussions on its use.
I will first try to install 2.5 and keep 2.49b.

OK lets get started. The first thing that I need to do is start drawing up the walls. I will use a scale of 1 blender unit to 1m.
Here are the current plans:


The plan
I seem to flip flop between modelling (the generation of the 3D structure) texturing (the painting and making the materials correct) lighting and animation. I should probably develop an appropriate plan. I should really follow the following process.
- Model - that is get the full geometry of the kitchen correct. This will get down to the following level of detail:
- Cupboards
- Drawers
- Handles
- Bench
- Sink
- Tap
- Stove (currently only planning on having a flat surface with an image)
- Oven
- Texture
- Light
- Animate
Background
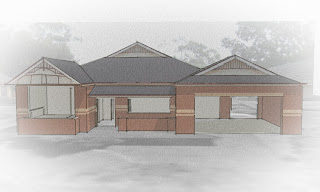
As part of building a house I am finding it very fun to draw the house in 3D and then revealing what everything is looking like. I started doing this using Sketchup, Googles very easy to use 3D drawing package. This is the sort of image that I can get of Sketchup.
 Whilst these are both very acceptable images I would like to be able to make something more like the following:
 This was done using blender an open source 3D animator and it was rendered with Yafray another open source piece of software. I love the way you can play with lights surfaces etc. in a much more powerful way than in Sketchup. You can also animate the scene to have really good fly throughs etc.
This blog will detail how I progress through trying to model the kitchen that we are currently building and then possibly the rest of the house.


This blog will detail how I progress through trying to model the kitchen that we are currently building and then possibly the rest of the house.
Subscribe to:
Posts (Atom)